Juniper Book: planning the cover, photo sequence and print files
A successful album begins with a sequence of photographs, but its cover and print files cannot be finalized until the production format is known. For a Juniper Book project, separate those tasks: decide what the album should say, establish the exact template and binding requirements, then check the photographs at their actual placed sizes.
The Juniper Book name appears under Cypress in album-design service Align Album Design’s list of product types. That confirms the product association, but does not provide a manufacturing specification. A verified Cypress template establishing dimensions, page limits, materials and export settings was not available for this guide. The calculations below are explicitly hypothetical; they are a method for preparing a project, not Juniper Book specifications or a statement of current availability.
Settle the production brief before designing the cover
Obtain the specification for the exact product and version being supplied. “A square album” or “the same as the sample” leaves too much room for misunderstanding. Keep the template file with the project and record its version or the date supplied. If a photographer or designer is placing the order, make that person responsible for confirming the production details.
| Confirm | Why it changes the design | Useful evidence |
|---|---|---|
| Finished page size and orientation | Determines the aspect ratio and the space available to each photograph. | Dimensioned template for the chosen product. |
| Page count and what “page” means | A leaf has two sides; suppliers may describe their packages differently. | A written count of printable sides, opening arrangement and any excluded endpapers. |
| Single-page or spread delivery | Changes file dimensions, numbering and treatment of the centre. | Export instructions and a sample of the required file structure. |
| Binding and centre restrictions | Determines which areas may be hidden, interrupted or difficult to view. | Template guides and, ideally, a physical sample of that binding. |
| Cover construction and personalization | A printed wrap, a photo window and a stamped title require different artwork. | Confirmed options, safe areas and artwork instructions for the selected cover. |
| Resolution, colour and file format | Controls image preparation and the final export. | The receiving printer’s requirements for this workflow. |
Album designers also need to know whether the first and last image areas are single pages or complete spreads. Do not infer this from the total number of sides. An album with 24 printable sides does not automatically accept twelve double-page image files in the way your layout software happens to export them.
Design the cover as a separate piece of work
Start with the information the cover must communicate. A wedding album might need two names and a date; a family collection might need a surname and a year range. Prepare the exact spelling, capitalization and punctuation before experimenting with type. For example, decide whether the approved title is “Maya & James” or “Maya and James”; keep that wording consistent on the cover, title page and order form.
If a photograph will appear on the cover, select it for the usable image area rather than merely choosing the favourite interior picture. A tight portrait may leave no space for a title or a crop. Try a second candidate with more surrounding space and compare both at the final proportions. Keep faces and lettering clear of the template’s folds, edges and other restricted areas.
If the chosen product offers a photo window, use its supplied shape and placement rather than treating the whole front cover as printable. If it offers stamped or debossed text, obtain the character, typeface and positioning limits before preparing artwork. A screen mock-up is useful for choosing a direction; it is not proof that a particular finish can reproduce that design.
Do not build a full cover wrap by joining two page-sized rectangles and inventing a spine between them. The actual construction may include board overhangs, hinges and turn-ins. In book-production systems such as Blurb’s, cover dimensions depend on the selected paper and page count. Use the confirmed template for your own supplier, and ask for it to be rechecked after any change to the interior specification.
Build a sequence before filling layouts
Give each selected photograph a job: establish a place, show a person, explain an action, record a detail or close the story. When two pictures do the same job, compare the expressions, framing and technical quality before keeping both. A near-duplicate earns its place if the change between frames matters; otherwise it competes with the stronger image.
Here is a constructed plan for twelve visual spreads containing 36 photographs, selected from a larger shortlist. It is a storyboard, not a claim about the Juniper Book’s capacity. Adapt it only after the actual opening arrangement and page allowance are confirmed.
| Spreads | Photographs | Purpose | Editing decision |
|---|---|---|---|
| 1–2 | 5 | Place and preparation. | One opening image, then four preparation photographs that show different actions. |
| 3–4 | 8 | Arrival and ceremony. | Show the sequence clearly; avoid several almost identical views of the same moment. |
| 5–6 | 4 | Reactions and a quieter portrait. | Three reactions followed by one image given a full spread’s attention, if the binding permits its crop. |
| 7–8 | 8 | Family and friends. | Check the people list before using extra space for decorative details. |
| 9–10 | 7 | Reception and speeches. | Pair the speaker with a meaningful response rather than grouping every microphone photograph together. |
| 11–12 | 4 | Celebration and closing. | Three lively frames followed by one clear final image. |
Review this sequence as small thumbnails before polishing individual pages. A spread crowded with details can be a useful contrast to a single portrait, but a repeated pattern of four nearly identical pictures on every spread gives each moment the same weight. Remove a weak frame or redistribute the images when that happens; do not enlarge the album simply to preserve every selection.
Calculate resolution after cropping
Effective resolution depends on the pixels left in the chosen crop and the size at which that crop is printed. Divide pixels along one dimension by the corresponding inches. Use both dimensions to check that the aspect ratio matches; stretching an image to make the numbers fit distorts it.
Adobe describes 300 pixels per inch as a common standard for high-quality prints. It is a useful planning target, not a universal guarantee of sharpness or a verified requirement for this album. Motion blur, missed focus and heavy compression remain visible problems even when the pixel count is high. Follow the printer’s target for the actual product.
| Placed image | Largest matching crop | Effective resolution | What the crop removes |
|---|---|---|---|
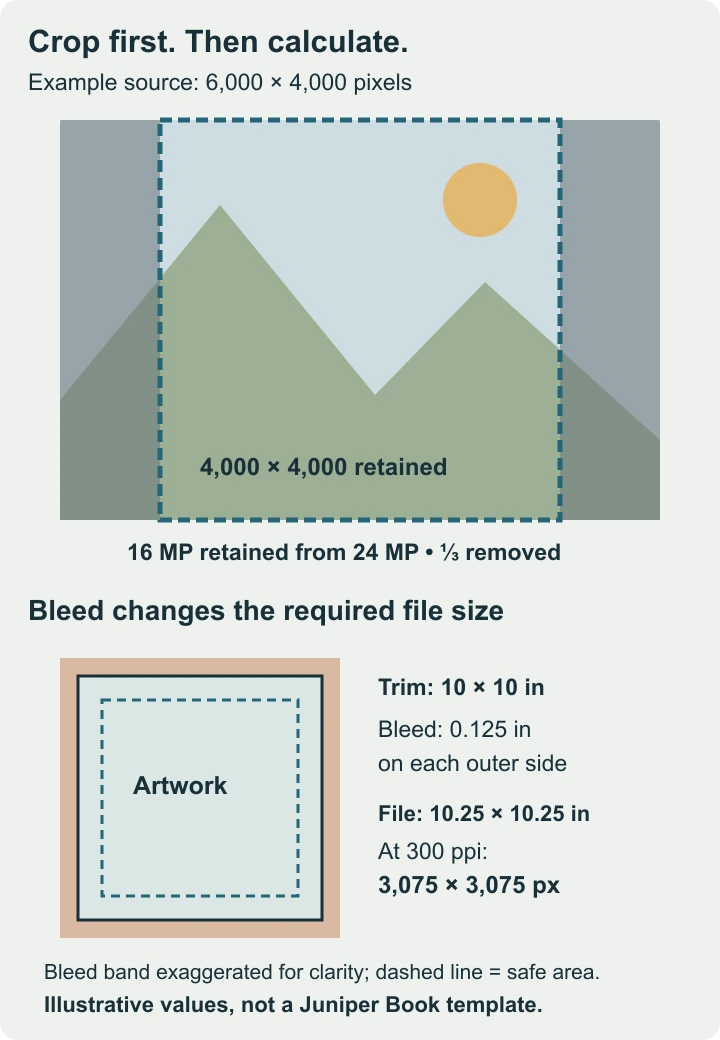
| 10 × 10 in square | 4,000 × 4,000 px | 400 ppi | One third of the original pixel area. |
| 12 × 12 in square | 4,000 × 4,000 px | About 333 ppi | The same area as the 10-inch square; enlarging the placement does not restore it. |
| 20 × 10 in wide image | 6,000 × 3,000 px | 300 ppi | One quarter of the original pixel area. |
| 8 × 12 in portrait image | About 2,667 × 4,000 px | About 333 ppi | About 55.6% of the original area; only a narrow vertical portion remains. |
These are the largest crops of those shapes, not recommendations about where to place the crop. A 4,000-pixel square can slide left or right within a 6,000-pixel-wide image. That may preserve a face at one edge but lose another at the opposite edge. Check the composition before judging the pixel count sufficient.
For a practical decision, suppose a favourite image has only 1,800 usable pixels across the required crop. At 12 inches it supplies 150 ppi; at 6 inches it supplies 300 ppi. A smaller placement may suit it better than a full-page enlargement. Compare a proof at the intended size rather than treating a software warning as the whole assessment.
Use the crop and print-resolution calculator to compare placements. It calculates the largest matching crop without rotating the source; it cannot judge expressions, focus or the best artistic crop. Editing the resolution label alone does not create new pixels. Resampling changes the pixel dimensions, but an enlarged file still needs a visual check.
Keep bleed, trim, safe area and the centre distinct
The trim line describes the intended finished edge. Bleed extends background artwork beyond that edge to accommodate trimming variation. A safe area sits inside the trim and keeps important content away from the cut. The centre of a spread is a separate concern: binding or a visible join can interrupt a face or a line of text even when every outer edge is correct.
Consider a hypothetical 10 × 10-inch page with a required bleed of 0.125 inch on each outer side of the delivered single-page image. Its full file area would be 10.25 × 10.25 inches. At 300 ppi, that is 3,075 × 3,075 pixels. An existing 3,000-pixel square filling that area provides about 292.7 ppi, not 300. This example shows why the calculation must use the delivered image area; its bleed value is not a Cypress specification.
Do not automatically apply that single-page calculation to a spread. The supplier may require a complete spread with different centre treatment or separate pages with a specified inner bleed. Use the supplied dimensions. Likewise, a face centred across two pages is a design choice to review against the actual binding, not something a nominal “lay-flat” description makes safe in every circumstance.
Proof the pictures that can reveal a printing problem
Ask which colour space and embedded profile the receiving workflow requires. Do not convert everything to a generic CMYK profile merely because the work will be printed, or assume that every service accepts the same RGB files. Keep the edited master images so that output files can be prepared again without repeatedly altering the originals.
Choose a small proof selection that includes skin tones, a dark suit or shadow area, a bright dress or pale highlight, a saturated colour and a black-and-white image if the album uses one. These examples test different weaknesses. Review whether dark detail remains readable, highlights still have useful texture and adjacent pictures of the same people look consistent.
Make a paper layout proof at actual size for crop, type size and spacing, with automatic “fit to page” scaling disabled. A home print can answer those layout questions but does not establish the colour of the production process. For a colour-critical decision, ask what proof or sample the printer can supply using the relevant materials and workflow.
Check the exported files, not only the working document
- Reopen the export. Check its dimensions, orientation and page or spread count against the production brief.
- Read every name and date. Compare them with the approved wording, including the cover and any captions.
- Inspect every crop. Look for clipped hands, faces near edges, unwanted objects and subjects crossing the centre.
- Check image quality at placement size. Pay particular attention to the largest pictures and the strongest crops.
- Remove production guides from the artwork. Check that no template labels, temporary comments or low-resolution placeholders have appeared in the export.
- Match the delivery instructions. Confirm file format, profile, bleed, naming and whether crop marks are wanted. Do not add marks by habit.
- Identify one approved version. Keep a dated approval record and give the deliverable a clear version number so an earlier proof cannot be mistaken for the print file.
The final folder should contain the exact production files, a concise specification note and the approval record. Keep editable layouts and original photographs in your own project archive. If the page count, cover choice or paper changes after approval, return to the affected template and repeat the relevant checks before sending the replacement files.