Hand off a photo album for production with a complete, approved file set
A photo album is ready for production when the approved design, the delivered files and the producer’s instructions describe the same object. Attractive spreads are only one part of that agreement. A missing final page, an ambiguous cover file or a late replacement with the wrong crop can undermine an otherwise carefully made album.
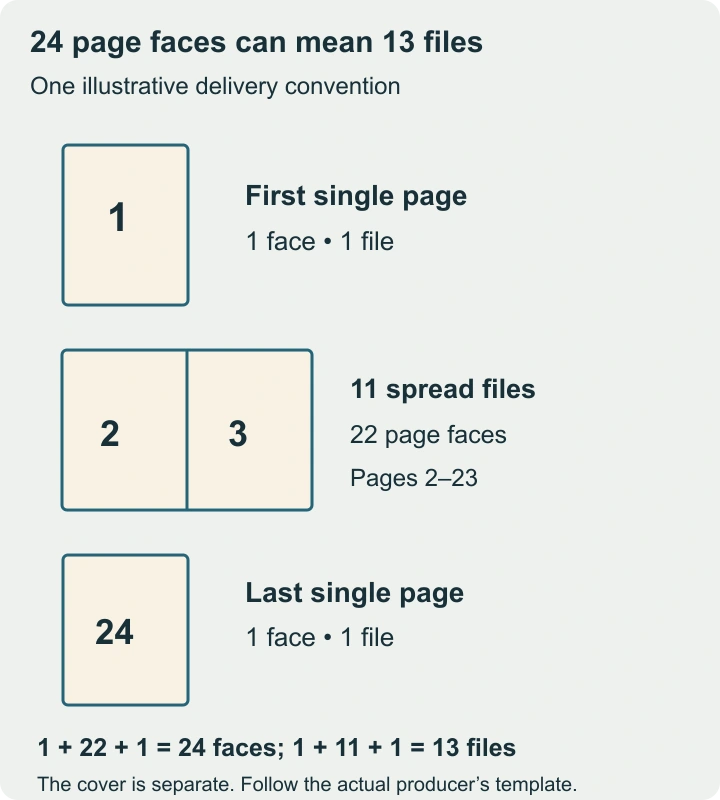
Build the handoff as a controlled file set with a manifest and an approval record. This guide gives a complete worked example, but its dimensions and page conventions are illustrative. Use the actual producer’s template and delivery requirements for the album being ordered; these examples are not historical or current Cypress production specifications.
Freeze the production specification first
- Record the ordered format, page count, binding, cover treatment and required file format before final export.
- Ask whether the producer wants individual pages, reader spreads, another arrangement or a print-ready PDF.
- Confirm whether endpapers, blank faces and the cover count toward the stated number of pages.
Use the producer’s own terminology in the order, then translate it into an explicit file map for your team. “Twelve spreads” and “twenty-four pages” may describe the same number of interior faces under one convention, but the required first and last files can still differ. Do not use a familiar convention from another supplier without checking it.
| Field | What to record | What to avoid |
|---|---|---|
| Product | Exact format, binding and material selections | A description such as “the large album” |
| Interior | Page-face count, file grouping and blank-page policy | An unexplained number of spreads |
| Geometry | Template version, trim, bleed and protected areas | A universal margin copied from another job |
| Color and format | Accepted profile, file type and export settings | Changing to CMYK merely because the job will be printed |
| Cover | Separate template, text, placement and any spine requirement | Deriving the cover from an interior-page size |
Map every page face to a delivered file
For a hypothetical 24-page interior, suppose the agreed convention is a single first page, eleven two-page spreads and a single last page. That is 1 + 22 + 1 = 24 page faces, delivered as 1 + 11 + 1 = 13 files. The cover is an additional file and is not part of those 24 interior pages.
| File | Page faces represented | Role |
|---|---|---|
album_v03_001_p01.jpg | 1 | Opening single page |
album_v03_002_p02-p03.jpg | 2–3 | First two-page spread |
album_v03_003_p04-p05.jpg | 4–5 | Second two-page spread |
| Continue the sequence through file 012 | 6–23 | Remaining nine two-page spreads |
album_v03_013_p24.jpg | 24 | Closing single page |
album_v03_cover.jpg | Separate from the interior count | Cover, using its own approved template |
The numerical file prefix preserves order, while the page notation makes the contents understandable. Include intentional blank pages in the map and state how they are supplied. A missing file and an intentional blank must not look identical to the receiving team.
For a simple geometry check, imagine a template whose single-page canvas is 3,000 × 3,000 pixels and whose two-page canvas is 6,000 × 3,000 pixels before any additional bleed requirement. A square file in the spread sequence is then an immediate warning. These figures demonstrate the check; they are not export instructions for your actual album.
Check the resolution of placed images after cropping
Effective pixel density depends on the pixels available for the placed image and its printed size. A 2,400-pixel-wide image placed 8 inches wide supplies 300 pixels per inch. The same pixels placed 12 inches wide supply 200 pixels per inch. If a crop retains only 1,800 pixels across and that crop fills 8 inches, the result is 225 pixels per inch.
Judge the cropped image actually used in the layout, not only the original photograph’s dimensions. Also check whether a design application has exported a preview instead of the intended original. A large canvas can contain a low-detail image; the overall file size does not prove that every placed photograph is suitable.
Adobe’s resolution guidance distinguishes changing printed dimensions from resampling the pixel array. Enlarging through interpolation does not recover detail that was absent from the source. Follow the producer’s quality requirements and inspect a representative proof when a low-resolution image is important to the story.
Review trim, fold and reading order visually
Inspect every page and spread at a useful scale, then review the whole album as a sequence. Check faces, hands, text and other important elements near trim edges or the gutter. A photograph can be technically within the canvas while placing its subject uncomfortably close to a finishing boundary.
Bleed is image or background intended to extend beyond the trim boundary. The protected area for important content serves a different purpose. Use the actual template for both. Do not interpret bleed as additional safe space for captions, and do not assume the full printed spread will be equally visible at the fold.
Read captions independently from the images once, then check them together. Verify names, dates, accents, chronological order and whether a caption still matches after a photograph was replaced. A spelling checker will not know that the right name has been assigned to the wrong person.
Use automated checks and a human proof for different jobs
Adobe InDesign’s preflight tools can flag issues such as missing fonts, changed links, overset text and low-resolution images, depending on the configured profile. Set that profile to the actual production requirements. An all-clear status means the selected checks passed; it does not verify family names, storytelling or the suitability of every crop.
| Check | Technical evidence | Human review still needed |
|---|---|---|
| Files are complete | Manifest count and expected names | The intended story and blank pages are present |
| Images are linked | No missing or outdated placed assets | The correct photograph and edit were selected |
| Text fits | No detected overset under the chosen checks | Names, line breaks and hierarchy read well |
| Geometry matches | Canvas dimensions match file classes | Important content survives trim and binding |
| Color setup matches | Profile and export settings follow the brief | A suitable proof supports appearance decisions |
Approve a named version, not a vague “final”
Make the proof correspond to the production export. Record its version, date, reviewer and approval scope. A low-resolution PDF can be useful for page order and wording, but it should not be treated as an authoritative color proof or a full-resolution sharpness check.
Use specific approval language: “Version 03 approved for page order, image selection, crops and captions; cover spelling approved separately.” If a physical proof is required, record its relationship to the production files and any requested changes. The person responsible for content should know which decisions they are making.
After approval, a change creates a new version. Re-export affected material, update the manifest and review the changed pages in context. If page count or binding information changes, the cover may also need reconsideration. Do not assume that replacing one interior image can never affect any other deliverable.
Deliver one unambiguous package
Place the production files, manifest and any requested instructions in a clearly named versioned folder. Keep proofs distinguishable from printable files. Follow the producer’s agreed policy for complete replacement sets or partial updates; if sending a partial update, identify exactly which prior files it replaces and obtain confirmation that the revision has been applied.
The manifest should list every delivered file, its purpose, dimensions and version. For a more controlled transfer, include byte sizes and SHA-256 checksums. A matching checksum establishes that the received bytes match the recorded file; it does not establish that the design inside the file is correct.
Ask the recipient to confirm the expected count and acceptance of the specification. Keep the approved proof, the exact delivered set and the approval record together, with a separate backup. Use the album handoff worksheet to assemble the record. A complete handoff leaves the producer with one clear set to manufacture and leaves you able to explain exactly what was approved.