Build a Travel Photo Album With Route, Scenes and Context
A travel album becomes more useful when it explains the journey between memorable views. Combine a clear route, a few developed scenes and selected details that show how the trip felt in practical terms. Use maps and tickets to clarify the story, while preserving the distinction between a contemporary record and a later illustration.
Start by choosing the kind of book: a chronological record, a place-based collection or a story about travelling together. The same photographs can produce different albums. Decide the reading structure before collecting decorative maps or filling every page with the most dramatic landscape.
Make the route legible without making a navigation map
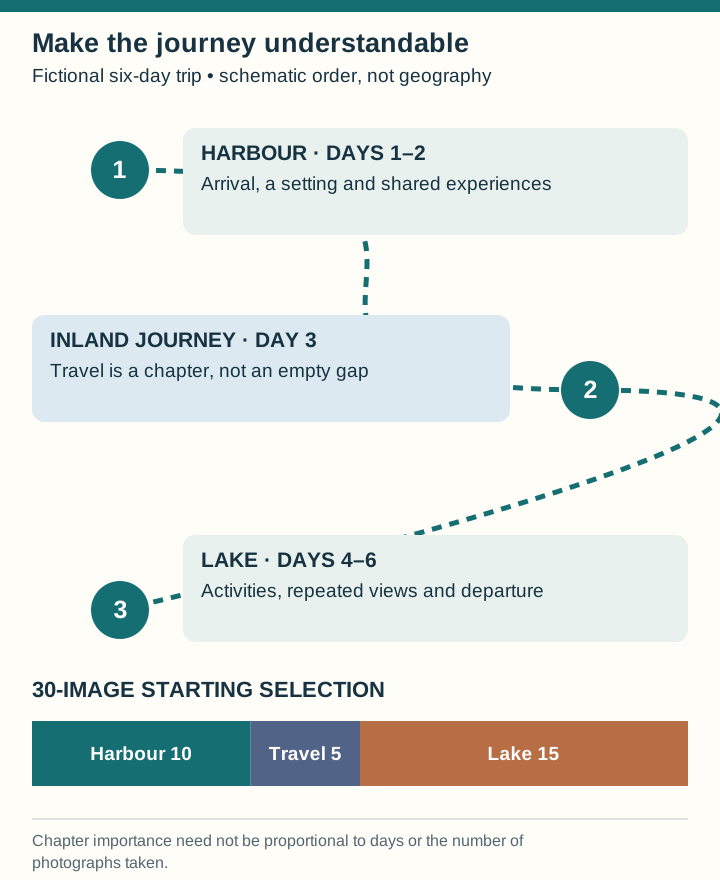
An original schematic can show the order of stops with names and dates. It does not need a precise coastline or road geometry if its purpose is to orient the reader. Label it as a route-order diagram when distances and positions are not geographically scaled.
For a fictional six-day journey, the family spends two days in a harbour town, one day travelling inland and three days near a lake. A simple sequence distinguishes those chapters. If the travel day includes a meaningful stop, represent it; do not hide it because it lacks a destination hotel.
| Trip stage | Time allocation | Story material |
|---|---|---|
| Harbour town | Days 1–2 | Arrival, streets, a shared meal and a first impression |
| Journey inland | Day 3 | A change of scenery, a stop and travelling together |
| Lakeside stay | Days 4–6 | Repeated visits, activities and a departure image |
The chapter lengths need not follow the days exactly. Three days in one place may produce a single strong story, while a short unexpected stop deserves a full spread. The itinerary supplies orientation; it does not dictate the artistic importance of each hour.
Build a scene from complementary photographs
Use pictures with different jobs: a setting, an interaction, a detail and a change or consequence. At a harbour, the wide view establishes the place; a photograph of people choosing food shows participation; a handwritten menu gives a specific detail; a later empty table can close the sequence.
This is an original editorial method, not a rule requiring four pictures on every spread. Sometimes one photograph contains all the needed information. The test is whether the next image adds something the reader could not get from the previous one.
Try removing each candidate temporarily. If the scene remains just as understandable, the image may be unnecessary. If removing a less spectacular picture makes the event confusing, that picture may be doing essential narrative work.
Use tickets and notes as information
A ticket can establish a route or date; a notebook entry can preserve a contemporary impression. Neither must appear at full size. Reproduce the relevant item clearly enough to read and provide a caption explaining why it matters. Avoid shrinking a whole document until it becomes an illegible texture behind the photographs.
| Object | Useful contribution | Before placing it |
|---|---|---|
| Transport ticket | A route, date or unexpected connection | Check legibility and remove unnecessary personal details from the published copy |
| Contemporary diary page | A voice from the time of the trip | Transcribe difficult handwriting and identify any edited extract |
| Postcard | What someone chose to send or remember | Distinguish its printed image from a photograph taken on the trip |
| Later original route diagram | Orientation for the reader | Label its schematic role and verify names and order |
For fragile originals, make suitable reproductions rather than attaching them directly to a new book. National Archives guidance warns against ordinary tapes, unstable adhesives and self-stick album pages for preservation. The capture guide explains how to retain a reference version while making a cropped presentation copy.
Keep observation separate from general claims about a place
“We found the market quiet on Tuesday morning” describes your experience. “The market is always quiet” makes a broader claim that one visit cannot establish. The Library of Congress's distinction between observation and interpretation is helpful when editing travel captions: say what the image or record supports, and qualify the conclusion.
Do not assign motives to strangers photographed in the background. Describe the visible activity when relevant, or focus the caption on your group's experience. Avoid turning a brief visit into a definitive statement about an entire community.
Use the caption record to verify place names, dates and people's identities. If a phone's clock remained on the home time zone, resolve the sequence using supporting information rather than silently trusting the displayed date.
Give repeated locations a reason to recur
A lake at morning, in a storm and at departure can show change. Three near-identical sunny views may not. If the repetition has a purpose, make it visible through sequence, scale or short text. A reader should not need to guess that the photographs were taken from the same point.
For the fictional trip, imagine a 30-image selection: 10 from the harbour, 5 from the inland journey and 15 from the lake. That is an editorial starting point, not a requirement proportional to days. If the lake selection contains six redundant views, moving space to the travel day may create a stronger book without adding any new photographs.
- Keep: images that establish a place or reveal a specific experience.
- Compare: similar viewpoints before selecting more than one.
- Explain: important changes that are not visually obvious.
- Remove: generic decoration that makes the journey harder to follow.
End the trip rather than stopping the file list
The last photograph in capture order is not automatically the best ending. Choose a departure, a changed view or a small detail that gives the reader a sense of completion. If the closing image was taken earlier, a thematic arrangement can use it without pretending it is a literal final moment.
Review the map labels against the chapter order and the captions against the placed images. Check the origin and intended use of externally supplied pictures or maps before including them; making an original diagram from your own itinerary can avoid unnecessary dependence on an unsuitable screenshot.
The phone-file guide helps gather the best source versions from several travellers. Keep the route notes and object records with the final selection. They allow a future reader to understand the trip as an experience with context, not just a sequence of attractive destinations.